Meet Nibbles and Pip

15 March 2022

Tutu Tuesday & a Tutorial 15 March 2022!

 Welcome back and happy Tutu Tuesday!

How's this gorgeous little number! It's no secret that I love Tutus and there's nothing more fun finding great little numbers that make a many of you smile!

Having selected this little cutie and those gorgeous colours this week, I've created a tutorial using alcohol Blends and 100% Isopropyl & a heat gun onto vellum. Once I had filled the sheet and it was all dry, I added some very fine lines of glue and adhered gold gilding flakes. Glued onto a sheet of basic white card stock so you can really see the results and tada, what a gorgeous background!

PLEASE NOTE: ordinary Isocol does NOT work this technique, you need 100% isopropyl. I bought mine from Bunnings. It is the Diggers brand, 500ml bottle. It comes with a spray top however, as it's a large bottle, I transferred some into a smaller bottle using a pippet.  The air puffer I have I have had for many years. I do believe it's still on the market but you can also get something similar from your local chemist which I think is used for cleaning out ears.  Basically you need something you can easily pump quickly with your hand to blow the isopropyl around your page to help spread the Blends' ink!


https://youtu.be/sa0vy7y_RoE 

Here are the finished pieces after the video was completed. One more Thanks card and 2 pieces left to create more cards. I added a bit of Magenta Madness to this 2nd background, gorgeous!


So, til next time, remember
happy stamping, colouring & creating!!


Product List

Heat Tool
[129056]
$50.00

11 March 2022

Colouring Ribbon Tutorial 11 March 2022

Hello and welcome to a new tutorial at last! I know, it's taken me ages to get back into the swing of things but I hope to have more newer tutorials soon and a bit more regularly too.

This Fabulous Friday at 5'o'clock (FFAF'ish!) shows you how you can change plain white ribbon into a colourful piece to be used on handmade cards and scrapbooking pages.   


In the past I have shown you all how I dye ribbons using rubbing alcohol mixed with reinkers then heat set with my heat gun. 

You'll find that tutorial here... https://www.youtube.com/watch?v=Ad7QV46RLGg

These next photos show previously hand coloured ribbons and a finished card using them.  PLEASE NOTE: items used in this card are retired therefore no longer available to purchase but there are many other products available you can substitued what I've used to create with!


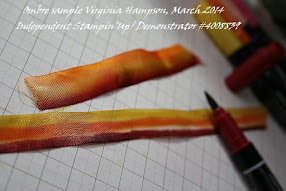
This time I'm using Stampin' Write markers which are dye based markers. 

Years ago I showed on an old blog how I did this however we no longer have that same width ribbon so I'm using the 1/4"/6.4mm wide crinkled white seam binding. If you have wider white ribbon, give it a go using it. I know some of us still have some that width though it's been retired by Stampin' Up! for some time now.

All you will need are the ribbon, a water brush or mini spritzer with water in it, a few colours of Stampin' Write markers that will blend well together.  A heat tool if you want to dry your ribbon faster as well. Yup, that simple.  Sit back and watch me blunder through my first video demo in ages.  Bare with me as I've new software as well so am also getting use to that too.


And here's a creation made using Basic White Note cards for the base & envelope, Basic White layer stamped using Blushing Bride, Gray Granite & Cinnamon Cider ink pads, Stampin'Write markers and stamp sets Artfully Layered & Hello Ladybug (sentiment stamp). 


Don't forget to decorate your envelopes & inside your cards!

til next time, remember,

happy stamping, colouring & creating!


Product List