
Meet Nibbles and Pip

About Me

Showing posts with label CASE'ing ie Copy And Share Everything. Show all posts

30 August 2019

Fabulous Fridays @ 5'o'clock, 30 August 2019

FFat5OclockishJune2019a

Hello everyone, it's been over a week since my last post and I do apologise. I've been up at my father's again, taking him for appointments and helping sort out his banking.  He didn't have any kind of card to be able to pay bills over the phone. So I got that sorted quick smart. He only had an eftpos card. How he's survived all this time with just one of those and an old fashioned check book is beyond me.  He agreed that sometimes he didn't want to get in his car and drive all the way to a post office just to pay a bill. I'm feel much relief that we got this sorted.
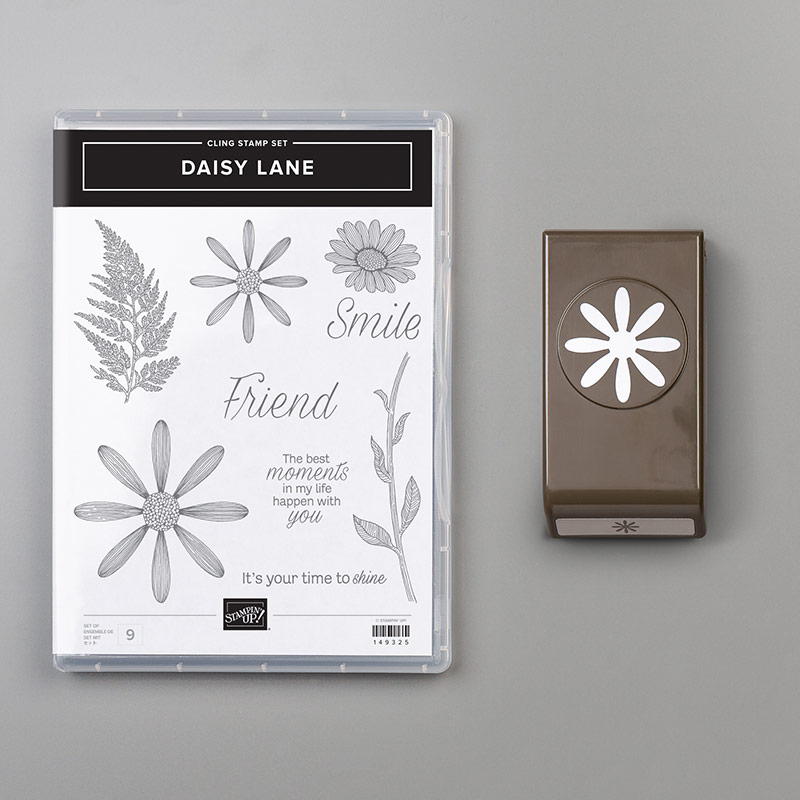


So what's new with Stampin' Up!?  Oh my goodness, wait til you see this year's holiday catalogue. At first I was hard pushed to want much from it but the more I flicked through it, the more I saw.  I have been sharing a few projects in the last month. However, today I'm sharing with you a card I created using Annual catalogue products and I am very happy with it indeedydoo!   Firstly, I did check out the amazing Youtube clip Stampin' Up! created to make those gorgeous layered daisy flowers on page 23 of the annual catalogue. Have you seen it yet?  If not here it is...


https://www.facebook.com/stampinup/videos/1331537627028702/


The Daisy Lane stamp & punch bundle is a great bundle to have AND it coordinates so well with the original Daisy Delight stamp set and larger daisy punch too!

For my project this week, I made one layered daisy as per the above video clip. I selected nice bright colours, Terracotta Tile & Pineapple Punch. My layered background is from the Perennial Essence Designer Series paper pack which I've run through my die cutting machine with a new folder coming in the Holiday Catalogue, called Hammered Metal.  I so love this embossing folder. I've been watching out for one that embosses like this for years so it was one of the first things I ordered with my pre-order items!  I did stamp my daisy stem and the leaves first though, using Mossy Meadow ink.closeup2My 'Smile' sentiment was stamped in Terracotta Tile then I punched it out using the Everyday Label punch, trimming it down to the size it is. I added a strip of the Woven Threads trim along the bottom.  Notice what I did?  I pulled the thread from the bottom of this trim to make it look like tassels. I didn't throw out that bit of thread either. I used it to make the little bow underneath the sentiment. Waste not, want not!   It's amazing trim, do get some!

closeup1

Finished3DDaisyLaneCard1a

I hope you enjoyed this creation. Remember, my online store is open 24/7 so you can shop any time of the day or night! 


til next time, remember


happy stamping, colouring & creating!


Product List


30 April 2019

TuTu Tuesday, 30/4/2019

TutuTuesdayNewHeaderDec2018jpg

Have you fluffed out your Tutu today yet? LOL, figuratively speaking?  It's like 'putting ya big girl pants on' hey, getting on with it, 'adulting' as some say but  yeah, who doesn't love a tutu to lift spirits, admire beauty, colour, glitter and maybe have a laugh?  Here's my Tutu for today!

Rock on tutu


I've a different subject to talk about today and it's going back to matching colours, how colours are made, how they are 'created' for the human eye to see.  It's no secret I frequent  Pantone®'s website and get their newsletters. A recent newsletter that came had me totally hooked and fascinated in it's information and explanation.  Have you seen around different sites/places/publications RGB/sRGB and CMY/CMYK ever mentioned? Well I thought those of you who might be secretly as nerdy nerd nerd as I can be when it comes to reading about these things might like to read this article. The link will be at the bottom of all this.

Learning what makes technology so fascinating, how printers work, how publications are created, how colours are mixed and not mixed, what makes the human eye see colours differently from one person to the next.  It's all fascinating to me.  In another life I so would have been a designer of some kind. I'd loved to have been given the opportunity to be a graphic designer or even interior designer or someone who helps choose colours for coordination in wow just any field you could think of but particularly in the area of art and creativity. (Which yeah I know is limitless!)

No photo description available.
NOTE: I did not create this graphic above, it was created by a lady named #KellyKent and shared on my upline's page by a fellow demonstrator, #JessieHolton

Why am I talking about this?  It's because new colours and shades come out all the time and like any company when creating a new range, Stampin'Up!® can't keep every single colour and range in stock for ever. Life would be pretty dull and boring if things didn't constantly change, upgrade or be improved upon or varied somewhat.  So with that in mind, the above colour chart for the new 2019-2021 In Colours, take a look at this recent article from:

Pantone©® 


( https://www.pantone.com/color-intelligence/articles/technical/what-are-your-color-spaces?utm_medium=email&utm_source=eb20190423 )

I hope you found that as fascinating as I did or it may have prompted you to realize that when new catalogues come out, every single product has to be reviewed, and carefully thought about going into the future.  Fashion changes, colour trends change, but they do have that six degrees of separation in that what was once old, is now new again and what was new is now old.  Oh my, that was 'deep' LOL

So till next time, remember


happy stamping, colouring & creating!


( Did you see what I did there?  I've used the hex colour coding in my sign off lines to use Pretty Peacock then Roccoco Rose! )


Copyright and Disclaimer Notice


All images are Copyright Stampin’ Up! 1990 to 2019, unless otherwise stated. All content is the sole responsibility of Virginia 'Wirg' Hampson Independent Stampin’ Up! Demonstrator & the use of & content of the classes, services & products offered on this website are not endorsed by Stampin’ Up!


19 April 2019

FF@F'o'clock'ish, 19th April 2019

PurpleNewFabulous Fridays at 5'o'clock'ish!

Hello there everyone & welcome to another Fabulous Friday at Five'o'clock'ish


Goodness me time is flying along. This time last week I was sitting in the first session of OnStage Live in Auckland, New Zealand.  And didn't I have a corker of a time away!  I've already shared a few new things too.  Today I am sharing one of the stamp sets I was given at this event, Free As A Bird! It's gorgeous and perfect for colouring in with Blends, Markers, coloured pencils etc.   Yes I said Blends!  I now have a total of 4 yes FOUR Blends which were given to me also over last weekend.  Some of you know that I am a certified Copic Marker Designer and Teacher so I have held off buying any Blends because let's face it, I've nearly 400 different colour copic sketch markers!  I honestly couldn't justify buying any Blends.

20190413_174310Any whooo, over last weekend I finally got to play with some for the first time and ended up with this 4 for free.   I have tried to replicate the make & take we did during our first session. It's amazing how you can blend such a limited number of colours to make others and that's exactly what I've done.  There is a list below of what I have used. But please note, most are new products that won't go on sale until 4th June when the new Annual Catalogue goes live to the public.   I have to share this because I'm positive this suite of products is going to be much loved! The background paper is called Bird Ballad!  But first, take a look at how lovely my huge desk looks. Those that know me know how little I am and I need things kept in reach or they just don't get used.  I set up my new storage system yesterday. A few sections are on back order but wow, just wow, how neat and tidy does this look? I had a huge cull at the same time so watch out on my Facebook Business page for an album of photos of everything I am selling off. I will share the link here when I have it set up.  Check out my desk, I've three times as much space to work at now, love it. And see the beautiful floral grid paper?  I laminated a few sheets of it and it's fabulous. All I have to do is spritz and wipe with an old hand towel or tissues and my area is clean!

The card on the left is the make and take created whilst at OnStage Live. The card on the right with matching envelope was made at home using only the 4 Blends I have. I over layed all 4 colours to create the branch. Rather clever I thought.

finishedFreeAsABird1a

Til next time, remember


happy stamping, colouring & creating!


Product List


12 February 2019

Tutu Tuesday, 12th Feb, 2019!

TutuTuesdayNewHeaderDec2018jpg

Welcome everyone,


Ah Tutus!


What would Tuesdays be in Wirgie's world without a cute Tutu!


Beautiful Peach and Coral Halter Tutu Dress. Girls by ToodlooTutus


This week I have created something that I have completely CASE'd (Copy And Share Everything) from the current Annual catalogoue.  If you have a look on page 148 you will see a lovey card on the bottom right hand side that has used a tree stamp from the Lovely As A Tree stamp set.  This stamp set has to be one of my favourites and also happens to be probably the oldest design in the Annual catalogue too.  It's loved world wide and thousands have expressed joy that it is still current today!  How could you retire a stamp set this beautiful!  Stampin' Up! agrees ;-)

So what I've done is stamp my line of trees (it's all one stamp) using Soft Suede ink.  Then I've taken some white embossing paste with a palette knife and mixed it on my silicon mat with one drop of Flirty Flamingo reinker (see how I've tied that colour in with my Tutu?)   Next I got a dry paint brush, picked up the coloured embossing paste and dabbed it all over the trees.

CloseUpOfTrees1a

I didn't finish there. I got my heat tool and blasted the paste dry. By doing this, it puffed up the paste some what given the trees a more 3D look.  Quite effective don't you think?

For my background I have used water colour pencils scribbled on well, then my aqua painter brush and blended the pencil to make the background look washed on.  My sentiment is from a stamp set you could earn for free from the Sale-A-Bration flyer, called Home To Roost.  Remember, you can only earn this by purchasing products to the value of $90AU or more until the end of March 2019.

Tadah, this is my finished CASE'd card. I love how when I heat set the embossing paste it puffed it up more, brilliant effect, they look like cherry blossom trees in full bloom!

FinishedTreeCard1a


I've layered my finished top piece onto Grapefruit Grove card then onto a Night of Navy fold base card. You can see inside but I've also stamped the trees in Night of Navy to decorate it.  Some lovely Lemon Lime Twist Organdy ribbon (sorry it's now sold out that pack of ribbons), the sentiment in Night of Navy on Whisper white and all complete!

I hope you like this weeks little tutorial, I certainly had fun with the embossing paste!

NOTE:  Should your embossing paste become dried out (like mine had) spritz it well with water, allow to sit for a few minutes then use your spatula to mix and blend it in to reconstitute it.  I took some out of the tub, put it onto my silicon mat and mixed it on there. One drop only of reinker is all you'll need as well.

Til next time,


happy stamping, colouring & creating!


Product List